How to Stop Text From Continuing Past Display on Windows Notepad
Z7_3054ICK0KGTE30AQO5O3KA30N0
hp-concentra-wrapper-portlet
![]() Actions
Actions
HP Notebook and All-in-One PCs - Troubleshooting Screen Issues (Windows 10, 8, 7)
This document pertains to HP notebook and All-in-One computers with Windows 10, Windows 8, or Windows 7.
This document provides solutions to a variety of problems that can occur with notebook and All-in-One displays such as blurry text, poor video performance, black or white screens, or damaged hardware. Find a section below that matches the problem with your display, and then follow the steps to resolve the issue.
Image on screen has fuzzy text, is blurry, or is stretched
Fuzzy text, images that are slightly blurry around the edges, or images that are stretched and out of proportion can be caused by improper screen resolution, incorrect graphics driver settings, or outdated BIOS or graphics drivers.

| Figure : Blurry display | Figure : Correct display |
| Figure : Stretched image | Figure : Image displayed correctly |


Use the following steps to resolve a fuzzy, blurry, or stretched display:
Step 1: Restart the computer
Some display problems resolve automatically when the computer is restarted.
If the image and text quality are corrected after restarting the computer, you are done troubleshooting.
If the problem persists, continue to the next step.
Step 2: Adjust the display resolution
Some problems with the display resolution can be resolved by adjusting the resolution. For instance, video games often switch the resolution while the game is running in order to optimize frame rates and graphic quality. If the game shuts down or exits improperly, the resolution might not be restored to the original settings.
note:The native (recommended) display resolution should produce the sharpest, most precise image on the screen. Resolutions above or below the native display resolution can cause a fuzzy or distorted display.
Use the steps in one of the following sections, depending on your operating system, to adjust the display resolution:
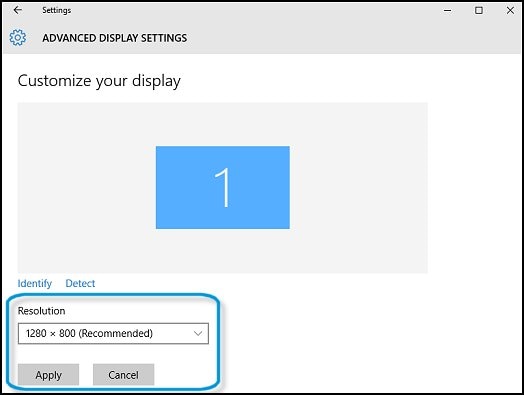
Windows 10
To adjust the display resolution on a computer running Windows 10, use the following steps:
-
Click Start, type resolution in the Search field, and then select Change the screen resolution from the search results.
-
The Advanced Display Settings page opens. Click the arrow next to Resolution to open the list of display resolutions.
-
Click the Recommended display resolution, then click Apply.
Figure : Changing the display resolution
If the image and text quality are corrected after adjusting the resolution, you are done troubleshooting.
If the problem continues, go to the next step.
Windows 8
To adjust the display resolution on a computer running Windows 8, use the following steps:
-
At the Start screen, type Change screen resolution to open the Search charm. Click Change screen resolution from the list of results.
-
Click the drop-down menu next to Resolution.
-
Move the slider bar to Recommended display resolution, and then click OK.
Figure : Screen resolution adjustment

If the image and text quality are corrected after adjusting the resolution, you are done troubleshooting.
If the problem continues, go to the next step.
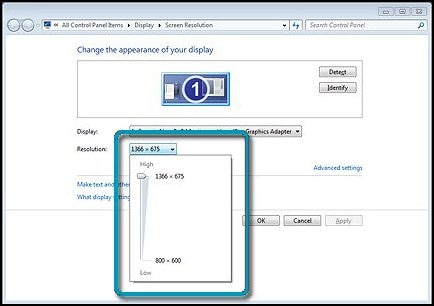
Windows 7
To adjust the display resolution on a computer running Windows 7, use the following steps:
-
Click Start, type resolution in the Search field, and then select the Adjust screen resolution Control Panel application from the search results list.
-
Click the drop-down menu next to Resolution.
-
Move the slider bar to the native display resolution, and then click OK.
Figure : Screen resolution adjustment
If the image and text quality are corrected after adjusting the resolution, you are done troubleshooting.
If the problem continues, go to the next step.
Step 3: Update the graphics driver software
Some image and text quality issues can be corrected by installing an updated graphics driver. Automatically search for updated graphics driver software using HP Support Assistant (recommended), or using Windows Update.
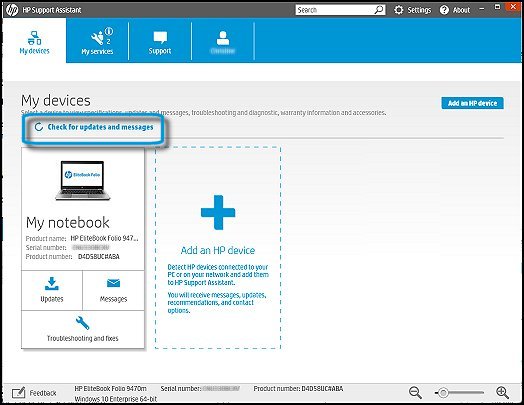
Update the graphics driver using HP Support Assistant
HP Support Assistant checks for specific resources for your HP computer and finds updates for the graphics driver suite and the LCD panel, if any are available.
note:Before using HP Support Assistant, be sure you are using the latest version. If you do not have the latest version, or you are experiencing problems with HP Support Assistant, see Download HP Support Assistant (in English).
Use the following steps to find updates in HP Support Assistant.
-
Open HP Support Assistant.
Select the My devices tab, then select your PC from the device list. Click Check for updates and messages.
Figure : Checking for updates in HP Support Assistant
-
If a graphics driver update is available, the update displays in HP Support Assistant, along with any other available updates for your computer. Follow the on-screen instructions to install the updates.
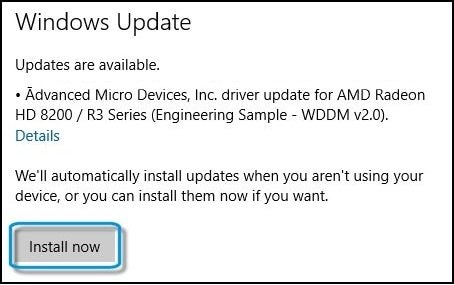
Windows 10 - Update the graphics driver using Windows Update
Follow these steps to search for and install suggested driver updates using the Windows Update tool in Windows 10.
-
In Windows, search for and open Windows Update.
-
Click one of the following options, if presented, on the Windows Update window:
-
Windows Update displays a list of available updates, including graphics driver updates. If updates are available to download, select any updates you want to download, and click Install now.
The installation process could take several minutes, depending on the size and number of updates being downloaded.
Figure : Click Install now
-
If no updates are currently listed, click Check for updates. If updates are available to download, select any updates you want to download including graphics driver updates. Then click Install now.
Figure : Check for updates

-
Windows 8 - Update the graphics driver using Windows Update
Follow these steps to search for and install suggested driver updates using the Windows Update tool in Windows 8.
-
At the Start screen, type Windows Update to open the Search charm.
-
In the search results, click Windows Update.
Figure : Windows Update search results

The Windows Update window opens.
-
Click Check for updates in the left panel.
Figure : Check for updates option
Windows Update displays a list of available updates, including graphics driver updates. Select any updates you want to download, and click Download. Your computer begins installing the updates immediately.
The installation process could take several minutes, depending on the size and number of updates being downloaded.
Windows 7 - Update the graphics driver using Windows Update
Follow these steps to search for and install suggested driver updates using the Windows Update tool in Windows 7.
-
Click the Start button and type Update in the search box.
-
In the search results, click Windows Update.
Figure : Windows Update search result
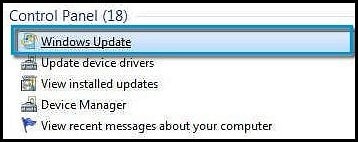
The Windows Update window opens.
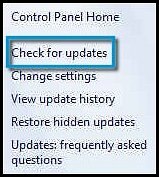
-
Click Check for updates in the left panel.
Figure : Check for updates option
Windows Update displays a list of available updates, including graphics driver updates. Select any updates you want to download, and click Download. Your computer begins installing the updates immediately.
The installation process could take several minutes, depending on the size and number of updates being downloaded.
Step 4: Download and install the latest BIOS and graphics drivers from HP
Many image and text quality issues can be resolved by installing updated graphics adapter device drivers and BIOS firmware.
See the following support documents for more information.
-
To update the graphics driver, go to the Update the graphics driver section of the HP document Obtaining Software and Drivers.
Image on screen shrinks when an external display is connected
When you view the same image on both the notebook or All-in-One display and an external display panel (monitor, projector, or television), the image shown on the computer display might shrink to a lower resolution, with black borders around the edges of the reduced display.
Figure : Example showing black borders and shrinking screen when connected to an external display
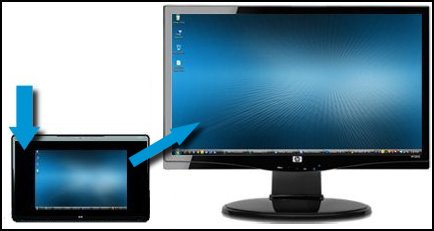
This issue can occur when the native display resolution of the computer and the resolution of the external monitor are not the same. When the graphic control detects two displays, it usually defaults to the lower resolution for both devices.
To resolve this issue, disconnect the external monitor to verify that the resolution on the computer display changes back to the desired settings. Reconnect the external monitor, and then adjust the resolution settings for each device using one of the following methods:
Control the graphic display using advanced graphics maintenance
Certain computer models that feature a high-performance chip or secondary graphics processing unit (GPU) have an advanced graphics maintenance function. Names of advanced graphics options may vary. To use an advanced graphics maintenance function (if available) to control the graphics display, right-click on the desktop and select one of the following options:
-
Graphics Properties or Graphics Options (Intel)
-
Vision engine or Catalyst Control (AMD)
-
Nvidia Control Panel (Nvidia)
Figure : Example of opening the advanced graphics menu

If the problem persists, check for and install any updates to the computer graphics adapter and BIOS firmware.
See the following support documents for more information.
-
To update the graphics driver, go to the Update the graphics driver section of the HP document Obtaining Software and Drivers.
Image on the screen has small dark or light dots
Because of the nature of LCD technology, a certain number of dots (pixels) might not display correctly. If the display has too many pixel defects within a certain area, the defects might obstruct proper viewing of images on the display.
Install the updated BIOS and graphics drivers to eliminate any potential software display problems.
See the following support documents for more information.
-
To update the graphics driver, go to the Update the graphics driver section of the HP document Obtaining Software and Drivers.
Figure : Example of pixel defects in the display panel
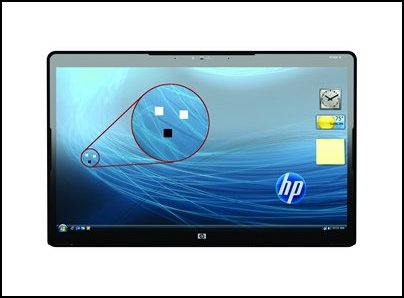
Image on screen flickers, has lines or distorted colors
The following conditions indicate a problem with the display or other computer hardware. There are no adjustments or corrective actions for the conditions in this section and the display will require repair.
| Figure : Flickering Screen | Figure : Vertical lines in the display |
| Figure : Solid horizontal green line | Figure : Incorrect colors |
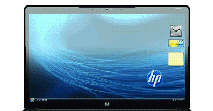
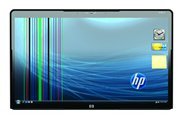


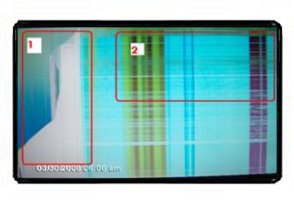
Image on the screen has multiple horizontal and vertical jagged lines, or large white or black areas
A cracked LCD displays damage in a number of different patterns. This type of physical damage can be detected as early as the BIOS-level startup operations, before the computer boots into Windows (or other operating systems). The display must be replaced. There are no actions available to correct this problem. The computer can be used by connecting it to an external monitor.
| Figure : Horizontal and vertical lines and large white area | Figure : Diagonal or jagged lines |

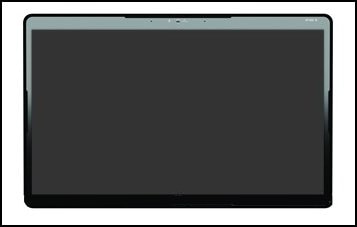
No image on the screen, or the screen is blank
If the computer screen remains black or blank, and there are no error messages on the screen, you must determine if this blank screen is caused by a problem with the display, or if it indicates a problem starting the computer.
Figure : Blank screen
To test for a defective display, use the following steps:
-
Connect the computer to an external monitor with a VGA or HDMI connector cable.
-
Connect AC power to the computer and the external monitor.
-
Press the Power button on the computer, and then press the Power button on the external monitor.
If an image displays on the external monitor but not on the computer display, download and install the latest BIOS, the latest graphics driver, and the latest CPU chipset. See the Obtaining Software and Drivers support document for more information.
Source: https://support.hp.com/us-en/document/c01881110
Post a Comment for "How to Stop Text From Continuing Past Display on Windows Notepad"